
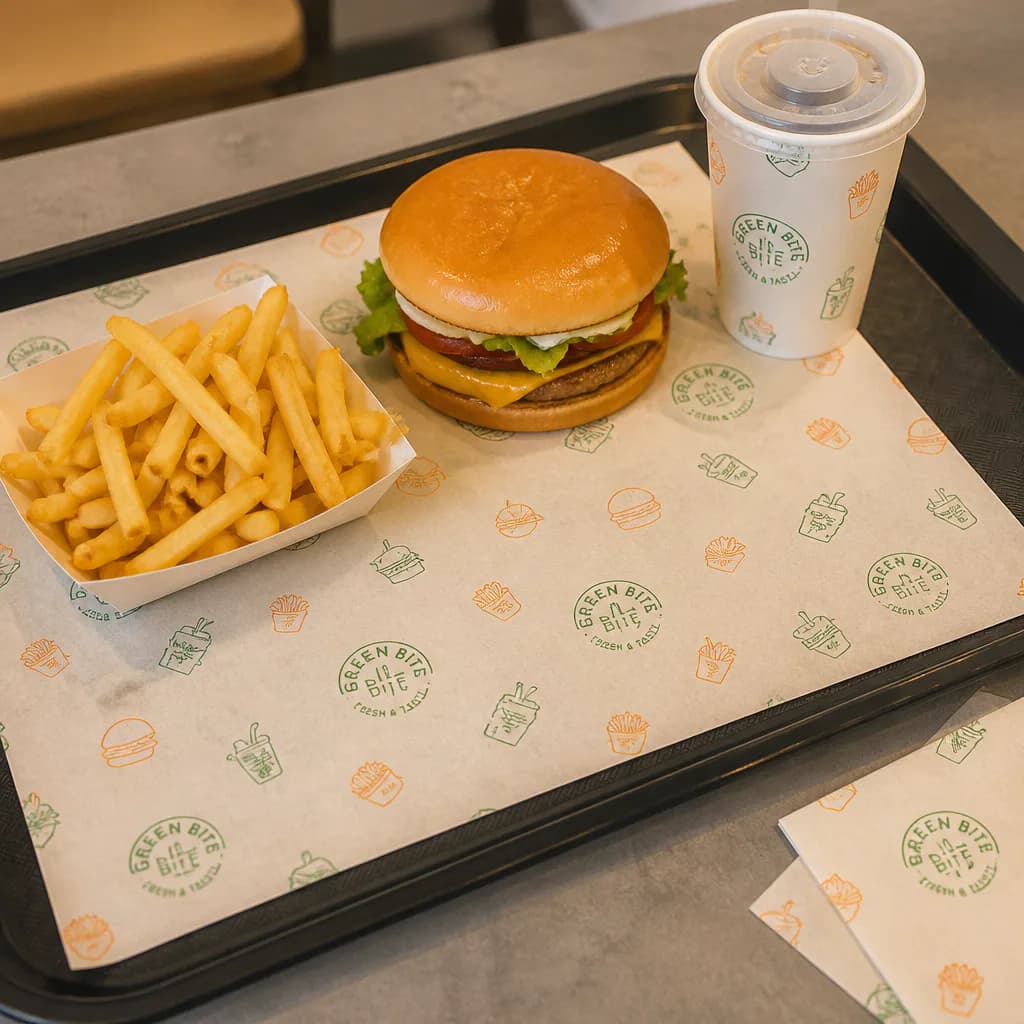
A paper tray liner should be sized around the usable inside area of the tray and the way a complete meal is arranged. The outside dimensions of a cafeteria tray are only a starting reference: raised rims, rounded corners, recessed bases and handles can all reduce the flat area that the paper can cover.
This guide is for flat paper liners placed inside large reusable cafeteria or meal-pickup trays. It does not treat a small food basket liner, a table placemat, a baking-pan liner or a food wrap as the same product. Those formats have different dimensions, contact conditions and buyer decisions.
1. Start with the serving tray, not a generic paper size
Before asking for a finished sheet size, identify the tray used in the real service process. Record the tray model, overall outside dimensions and the shape of its usable base. If several tray models are used, decide whether one liner must work across all of them or whether separate sizes are acceptable.
Useful references include:
- a clear top-view photograph of the empty tray;
- the tray's outside length and width;
- the flat inside length and width between raised edges;
- corner radius or tapered areas that reduce coverage;
- handles, drainage details or textured areas that should remain uncovered;
- the orientation customers and staff use when carrying the tray.
The most important measurement is the largest flat rectangle that can sit naturally inside the tray without climbing the rim, folding into a corner or interfering with a handle. If the tray base is not rectangular, make a paper template and trim it until it lies flat.
2. Measure the usable inside area
Place the tray on a level surface and measure the inside base, not only the catalogue dimensions. Take measurements in more than one position because the sides may taper. Then check the result with a plain paper prototype.
A practical measurement sequence is:
- Measure the longest flat inside length before the liner reaches the raised ends.
- Measure the narrowest useful inside width between the side walls.
- Mark rounded corners, recesses or handle openings on a simple sketch.
- Cut a plain sheet to the proposed size and place it inside the tray.
- Lift and tilt the tray to see whether the sheet catches, folds or moves into an unwanted area.
Do not assume that maximum coverage is always the best result. A sheet that exactly reaches every edge can be harder for staff to place quickly and may curl against the rim. A slightly smaller sheet may sit flatter, but the acceptable margin should be judged on the actual tray and meal layout.
When sending dimensions to a supplier, state them as finished liner length × width and label the tray orientation. Add the usable inside dimensions separately so the supplier can understand how much clearance has been allowed.
3. Load the complete meal before approving coverage
An empty tray does not show how the liner will work in service. Arrange the normal meal components on the tray before approving size or artwork. Include the largest realistic combination: main container, side dish, drink, cutlery, napkin, sauce cups and any loose wrapped item.
Check these questions with the loaded tray:
- Does every item stand on the liner, or only the main food containers?
- Do cup bases or box corners sit close to an uncovered tray edge?
- Is there enough visible paper for branding after the meal is loaded?
- Can staff place the liner and meal quickly in the intended order?
- Does a loose edge catch when the tray is carried or returned?
- Will wet cups, oily containers or condensation touch the paper?
This loaded-layout test also prevents a common print mistake: approving a centered logo that is completely hidden by the main dish. The useful viewing area may be a narrow strip near the customer, a corner beside the drink or a repeated pattern visible around several containers.
If the meal itself needs separate packaging, specify those components independently. For example, a hot dog tray supports an individual hot dog, while a French fries box holds a side order. The large paper tray liner supports the assembled meal presentation; it is not a replacement for those containers.
4. Define what will touch the paper
Material should be selected after the contact conditions are understood. Do not request “greaseproof paper” only because the liner is used in foodservice. Some projects place closed boxes and cups on the paper, while others allow unwrapped food, oil, moisture or hot containers to touch it directly.
Describe the real conditions:
- direct or indirect food contact;
- dry, oily, moist, hot, chilled or mixed items;
- expected time between tray assembly and clearing;
- whether condensation may form under cups or containers;
- whether the liner is single use;
- destination market and documents the buyer needs to review.
These facts help the supplier discuss paper type, surface treatment, print system and documentation. They do not replace a sample test or the buyer's compliance review. Avoid approving material from grammage alone: papers with the same nominal gsm can differ in stiffness, absorbency, surface and print result.
If loose food will touch the liner, identify the food and contact time. If all food remains inside separate packaging, say that clearly. The two situations should not be treated as identical simply because the finished sheet looks similar.
5. Design print around the loaded-tray view
A tray liner can carry branding, menu information, campaign graphics or service instructions, but the artwork must be evaluated with the meal in place. Begin with a top-view sketch showing both the liner and the normal container positions.
For a single logo, choose a zone that remains visible after loading. For a repeated pattern, check whether the repeat is large enough to be recognized around containers. Keep small text, QR codes and critical information away from areas likely to be covered, creased, stained or cropped by rounded tray corners.
Confirm the following before artwork approval:
- finished sheet size and orientation;
- one-side or two-side print requirement;
- number of colors and color references;
- repeated pattern or fixed-position layout;
- trim tolerance around borders and corner graphics;
- whether any variable promotion or branch information is required;
- the chosen paper's effect on printed color and contrast.
A screen mockup can confirm position, but it cannot show every effect of the selected paper or real foodservice use. Ask for the appropriate proof or sample stage for the project, and judge it under the lighting used at the service counter.
6. Check one sample in three views
Review the proposed liner in three different states rather than approving it as a flat artwork file only.
Empty-tray view: Confirm that the sheet sits flat, has intentional clearance and does not cover handles or functional tray details.
Loaded-tray view: Place the full meal on the liner and check product stability, visible print area, wet or oily contact points and staff loading speed.
Customer-view and return view: Carry the tray from the pickup counter to a table, then clear it as staff normally would. Check whether the liner shifts, catches or creates an avoidable handling problem.
Photograph all three views. If a change is needed, revise one variable at a time—such as sheet size, logo position or paper requirement—so the next sample can be compared with the first.
7. Build an RFQ that can be reviewed
A useful quotation request gives the supplier enough information to review the format instead of guessing from a product name. Include:
- Finished liner length × width and orientation
- Tray outside dimensions and usable inside dimensions
- Tray photograph or simple dimensioned sketch
- Full meal layout photograph
- Direct or indirect food-contact condition
- Heat, oil, moisture and expected contact time
- Paper requirement or sample to match, if available
- Artwork file, colors and print coverage
- Estimated order quantity and packing preference
- Delivery country and documents required for buyer review
If size, material or print is not yet fixed, mark those fields as open for supplier review instead of inserting an unverified specification. A short, accurate RFQ is more useful than a detailed form built from assumptions.
Frequently asked questions
Is a cafeteria tray liner the same as a food basket liner?
No. This guide covers a flat sheet for a large reusable serving tray that carries a complete meal. A food basket liner fits a smaller basket or serving container and needs its own measurement, folding and food-contact review. They should not be merged only because both can be made from printed paper.
Is a tray liner the same as a placemat?
No. A tray liner is fitted and tested inside a serving tray. A placemat is used on a table or counter and may have a different size, purpose and contact environment.
Does every paper tray liner need grease resistance?
Not necessarily. The requirement depends on what touches the liner, how oily or moist it is, how long contact lasts and what the destination market requires. Share the real food and container layout before choosing the paper.
Can the same sheet also be used as a food wrap?
Do not assume so. Wrapping creates folds, pressure, direct contact and handling conditions that a flat tray-liner test does not cover. Review a wrap as a separate format.
What should be confirmed for custom printing?
Confirm finished size, orientation, visible areas after loading, color references, print coverage, paper appearance, proof method and the artwork file. A loaded-tray photograph is especially useful for deciding logo position.
Discuss a paper tray liner project
View our custom paper tray liners and related meal components such as burger boxes, then send the tray dimensions, meal layout, contact conditions, artwork, quantity and delivery country through the quote form.